LIQUID PENETRANT INSPECTION (PT)
Introduction & Basic Principle
Liquid Penetrant Inspection is based upon capillary action, where low surface tension fluid penetrates into clean and dry surface-breaking discontinuities. Penetrant may be applied to the test material by dipping, spraying, or brushing. After adequate penetration time has been allowed, the excess penetrant is removed, and a developer is applied. The developer helps to draw penetrant out of the flaw where a visible indication becomes visible to the inspector. Inspection is performed under ultraviolet or white light, depending upon the type of dye used – fluorescent or non-fluorescent (visible).
Liquid penetrant inspection is a widely applied and low-cost inspection method used to locate surface-breaking defects in all non-porous materials (metals, plastics, or ceramics). Penetrant may be applied to all non-ferrous materials, but for inspection of ferrous components magnetic particle inspection is preferred for its subsurface detection capability. LPI is used to detect casting and forging defects, cracks, and leaks in new products, and fatigue cracks on in-service components.
Process:
Application
Liquid penetrant inspection (LPI) is one of the most widely used nondestructive evaluation (NDE) methods. Its popularity can be attributed to two main factors: its relative ease of use and its flexibility. LPI can be used to inspect almost any material provided that its surface is not extremely rough or porous. Materials that are commonly inspected using LPI include the following:
• Metals (aluminum, copper, steel, titanium, etc.)
• Glass
• Many ceramic materials
• Rubber
• Plastics
LPI offers flexibility in performing inspections because it can be applied in a large variety of applications ranging from automotive spark plugs to critical aircraft components. Penetrant material can be applied with a spray can or a cotton swab to inspect for flaws known to occur in a specific area or it can be applied by dipping or spraying to quickly inspect large areas. Above, visible dye penetrant being locally applied to a highly loaded connecting point to check for fatigue cracking.
Penetrant inspection systems have been developed to inspect some very large components. In the image shown right, DC-10 banjo fittings are being moved into a penetrant inspection system at what used to be the Douglas Aircraft Company’s Long Beach, California facility. These large machined aluminum forgings are used to support the number three engine in the tail of a DC-10 aircraft.
Liquid penetrant inspection is used to inspect for flaws that break the surface of the sample. Some of these flaws are listed below:
• Fatigue cracks
• Quench cracks
• Grinding cracks
• Overload and impact fractures
• Porosity
• Laps
• Seams
• Pin holes in welds
• Lack of fusion or braising along the edge of the bond line
As mentioned above, one of the major limitations of a penetrant inspection is that flaws must be open to the surface. To learn more about the advantages and disadvantages of LPI, proceed to the next page.
Primary Advantages
• The method has high sensitivity to small surface discontinuities.
• The method has few material limitations, i.e. metallic and nonmetallic, magnetic and nonmagnetic, and conductive and nonconductive materials may be inspected.
• Large areas and large volumes of parts/materials can be inspected rapidly and at low cost.
• Parts with complex geometric shapes are routinely inspected.
• Indications are produced directly on the surface of the part and constitute a visual representation of the flaw.
• Aerosol spray cans make penetrant materials very portable.
• Penetrant materials and associated equipment are relatively inexpensive.
Primary Disadvantages
• Only surface breaking defects can be detected.
• Only materials with a relatively nonporous surface can be inspected.
• Pre-cleaning is critical since contaminants can mask defects.
• Metal smearing from machining, grinding, and grit or vapor blasting must be removed prior to LPI.
• The inspector must have direct access to the surface being inspected.
• Surface finish and roughness can affect inspection sensitivity.
• Multiple process operations must be performed and controlled.
• Post cleaning of acceptable parts or materials is required.
• Chemical handling and proper disposal is required.
MAGNETIC PARTICLE TESTING DEFINITION ( MT)
Introduction & Basic Principle:
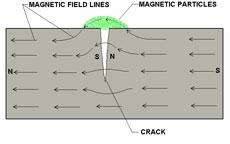
When magnetism applied through ferromagnetic materials by using electrically or by using permanent magnet, magnetic poles of leakage field will occur at discontinuities. Magnetic powders applied throughout the object to see such leakage field as discontinuity indication.
Magnetic particle testing is a relatively simple test method that can be applied to finished articles, billets, hot rolled bars, castings, and forgings. It can also be used to check that the processing operations such as heat treat, machining, and grinding did not uncover or cause discontinuities. Magnetic particle consists of magnetization of the article, application of the particles, and interpretation of the patterns formed by the particles as they are attracted by magnetic leakage fields.
Advantages:
Magnetic Particle Testing is one of most economical method to find out surface cracks in ferromagnetic materials. It is portable and easy for application.
Limitation:
It is limited application to only on ferromagnetic materials. Further it is limited to disclosing only those discontinues that are at or near the surface.
RADIOGRAPHIC TESTING (RT)
Introduction & Basic Principle
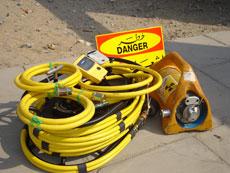
Radiographic testing is working on the principle of penetration and absorption capabilities of X and gamma radiation. Radiography is used to test a variety of non-metallic products and metallic products such as welds, castings, forgings, and fabrications. Since it is capable of revealing discontinuities (variations in material composition, or density) in a variety of dissimilar materials, radiographic testing is one of the primary nondestructive test methods in use today. Radiographic testing usually requires exposing film to X rays or gamma rays that have penetrated a specimen, processing the exposed film, and interpreting the resultant radiograph.
For radiographic testing there are two electromagnetic radiation sources are available. One is X ray and another one is gamma ray. Throughout the spectrum, X rays and gamma rays have the same characteristics, and X rays and gamma rays of the same wavelength have identical properties.
Radiographic Testing is most often used for process control during manufacturing, to detect subsurface discontinues in end products such as castings, welds, ceramics and composite materials and electronic components. RT is applied in building and bridge construction, aircraft aviation and aerospace, automotive and space components manufacturing, and aircraft overhaul, maintenance and repair. It is also used for inspecting piping and pipelines, refinery vessels, steel pressure vessels and storage tanks.
Advantages:
RT can be used to detect internal discontinuities in almost any material that is not too thick. X-ray machines capable of penetrating as much as 660 mm (26 in.) of steel and greater thickness of other materials are available. RT can disclose internal structures, configurations, fluid levels, and fabrication or assembly errors. In most applications, RT provides as image of the test object that can be kept as permanent record. Isotopes are often used for portable application and for field testing.
Limitations:
The major limitations of RT are that the opposing sides of the test object must be accessible, precautions to prevent personnel exposure to radiation are required and configuration of the object must allow for satisfactory formation of shadows of its internal structure.
ULTRASONIC DEFINITION (UT)
Introduction and Basic Principle
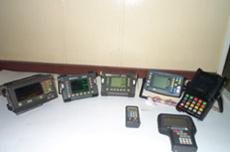
Ultrasonic is the name given to the study and application of sound waves having frequencies higher than those which the human ear can hear. Adults with normal hearing can hear frequencies up to a range of 16,000 cycles per second (16 kHz) to 20,000 cycles per second (20 kHz). Ultrasonic nondestruc¬tive testing is the use of ultrasonic to examine, or test, material without destroying the material.
Applications:
An ultrasonic test may be used to measure the thick¬ness of a material or to examine the internal structure of a material for possi¬ble discontinuities such as voids and/or cracks. Because of the basic characteristics of ultrasonic testing, it is used to test a variety of both metallic and nonmetallic products such as welds, forgings, castings, sheet, tubing, plastics, and ceramics etc. since ultrasonic testing is capable of economically revealing subsurface discontinuities (variations in material composition) in a variety of dissimilar materials, it is one of the most effective tools available to quality assurance personnel.


